Jet Reports
Trial Balance Report
A trial balance report is a financial report that lists all of the accounts in a company's general ledger along with their ending balances for a specific period of time, typically a month or a quarter. The purpose of the trial balance report is to ensure that the total debits equal the total credits in the ledger, which is an indication that the accounting entries are balanced.
The trial balance report can help businesses to identify errors in their accounting records, such as incorrect journal entries or transposition errors, which can cause the debits and credits to be out of balance. If there are any discrepancies in the report, the company can investigate and make adjustments as needed to ensure the accuracy of its financial records.
The trial balance report is often used as the basis for preparing financial statements such as the income statement, balance sheet, and cash flow statement. It is a valuable tool for internal financial management and is also required by external auditors during an audit of a company's financial statements.
Let’s see how to do this with Jet Reports. Open your excel report and go to the Jet tab.
Navigate to the Report options and fill in the following.
Under Title
Period start
Period End
Under value
Your expected starting date
Your expected end date
4. After you close the window, a new page titled 'Options' will appear automatically. it should look like this…
5. GO back to Sheet1, navigate to tools and click on NL. Fill in as shown to create the Period Start date on sheet 1 page.
Note: To fill in for Period Start ‘filter’, navigate to Nested Jet Function, and click on 'Insert NP'.
6. To fill in for Start Date and End date, click on Insert Report Options. A new window will appear.
a. Click on Period Start, then add to fill in for Start Date
b. Click on Period End, then add to fill in for End Date
7. Navigate to tools again, click on NL function, and fill in as shown to create Period End Date on sheet 1 page
8. Your date might appear in form of numbers, no worries. Just right-click on it, and go to Format cells-change from General to Date.
9. Your report is ready to run. When you run your Report, you should have something like this.
Now, Let’s use the monthly report we just build into our sales report.
We want to use our monthly report in our G/L Account Balance, which we will display with
G/L account number
Name
Account type, and
Balance.
We get our Account number, name, and account type using the NL and NF function. but the balance is received using our G/L function.
Now we retrieve our No., Name, and account type using the NF function.
we fill in as shown, and change the field for each no, name, and account type
Now, let’s get the balance from the GL function and fill it in as shown below.
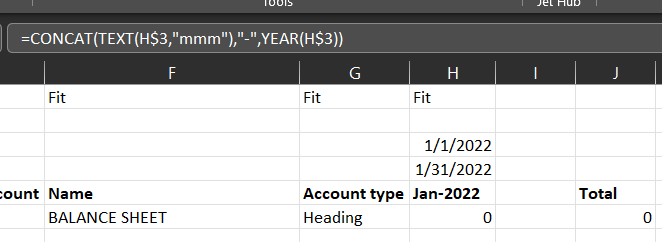
we will want our monthly movement to display by the names of month and year. We use our Excel formula to create that.
Where we have “jan-2022“, we fill in the formula shown above in it. this allow Excel to automatically display all the months in the given year.
if you run your report, you should have something like this.
If you encounter any problems, please contact habib@onpointserv.com


